Why French Cleats Are Your Workshop’s Secret Weapon
Did you know that a poorly organized workshop can cost you up to 15% of your productivity? That’s a staggering figure, equating to hundreds of hours lost annually sifting through tool drawers and rummaging for that one specific jig. Many DIYers and seasoned woodworkers alike wrestle with the chaos, often accepting it as an unavoidable byproduct of their passion. But what if I told you there’s a simple, elegant solution that’s been hiding in plain sight, turning cluttered garages into streamlined command centers? It’s a system so effective, it can make finding a specific screwdriver as quick as grabbing a cup of coffee. This system involves a deceptively simple joinery technique that’s become an industry standard for efficient, adaptable tool storage: the French cleat.
What Exactly Is a French Cleat System?
At its heart, a French cleat is a type of interlocking joinery. It uses two identical pieces of wood, each cut at a complementary angle – typically 45 degrees. One piece is attached to the wall, with the longer, beveled edge pointing upwards and away from the wall. The second piece is attached to the back of a tool holder, cabinet, or shelf, with its bevel pointing downwards and away from the object. When you bring the tool holder to the wall-mounted cleat, the beveled edges interlock, creating a secure, gravity-assisted hanging mechanism. This creates a modular system. You can hang, rearrange, or remove items effortlessly. Think of it like a sophisticated, heavy-duty version of the interlocking tabs you see on some picture frames, but designed for the robust demands of a workshop environment. This adaptability is key to its widespread adoption. For instance, a woodworker might have a dedicated cleat strip for their most-used chisels, another for measuring tools, and yet another for power tool accessories like drill bits and driver heads. The beauty lies in the fact that each piece is self-contained and can be moved independently.
Why Bother With French Cleats for Storage?
The primary benefit of adopting a French cleat system for your workshop storage is unparalleled flexibility. Unlike fixed shelving or pegboards that limit you to specific hook placements or shelf heights, French cleats allow you to customize your layout on the fly. Need to hang a large power tool today and a collection of small hand tools tomorrow? No problem. You simply detach the old holder and attach the new one. This adaptability is crucial. Imagine a scenario where you’re building a large cabinet. You might need to hang several large, heavy clamps within easy reach. Once the cabinet is built and you’re working on smaller projects, those clamp holders can be moved to a less prominent spot, making way for a dedicated holder for your sanding blocks and sandpaper. Furthermore, the load-bearing capacity is impressive. A well-constructed cleat system, using appropriate timber like plywood or solid wood, can safely support significant weight. I’ve seen 3/4-inch plywood cleats holding upwards of 50 pounds of tools without any sign of strain. This robust nature means you’re not limited to storing lightweight items; you can hang even your heaviest power tools securely.
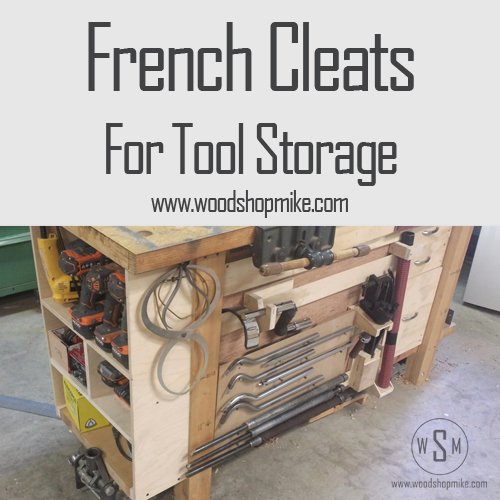
How Do You Build and Install a French Cleat System?
Building your own French cleat system is surprisingly straightforward, even for those with only moderate woodworking skills. You’ll need a table saw or a good quality circular saw with a straight edge guide to make precise angled cuts. Start by cutting strips of your chosen material – 3/4-inch plywood is a popular choice due to its stability and cost-effectiveness, though solid wood like pine or oak also works well. Each strip needs to be cut lengthwise at a 45-degree angle. It’s critical that both the wall cleats and the object cleats have the exact same angle. You’ll want to rip your material so that you have two identical strips with complementary bevels. For example, if you rip a 3/4-inch thick board at 45 degrees, one piece will have a thin edge and a thick edge, and the other will be the inverse. You then attach these strips to your wall studs, ensuring they are level. Use long screws that penetrate deeply into the studs to guarantee a secure mount. For the tool holders, you attach the mating cleat to the back of the item, ensuring the bevel faces the correct direction to interlock with the wall cleat. A common mistake is to cut the angle incorrectly or to mismatch the angles between the wall and the object cleats, rendering the system useless. Always double-check your saw’s setting and measure twice before cutting. When I first built my system, I used a miter gauge on my table saw, which is perfectly adequate for smaller projects, but for long wall strips, a sled with a reliable angle stop is far more precise and safer.
Who Benefits Most From French Cleat Storage?
While virtually anyone with a workshop or garage can appreciate the organizational benefits, French cleats are particularly advantageous for woodworkers, metalworkers, and hobbyists who frequently change their project setups. Think of a luthier, a guitar maker, who might need to switch from holding a guitar body for fretwork to mounting specialized carving tools. A French cleat system allows them to reconfigure their workspace in minutes, not hours. Similarly, a model builder might need different tool arrangements depending on whether they’re assembling an aircraft or a ship. Even a serious home gardener could use them for organizing trowels, shovels, and hoses in a shed. The modularity means the system scales with your needs. A small electronics repair bench could use a few short cleats for holding soldering irons and multimeters, while a large auto repair bay might have extensive cleat systems covering entire walls for wrenches, sockets, and power tools. The initial setup cost is minimal compared to commercial storage solutions, making it an accessible upgrade for hobbyists and professionals alike. A key insight here: it’s not just about tools. You can hang bins, lights, charging stations, and even small work surfaces using French cleats, turning your entire wall into a customizable organizational grid.
When Should You Implement a French Cleat System?
The ideal time to install a French cleat system is during a workshop renovation or decluttering phase. If you’re building new cabinets, adding new wall coverings like pegboard or slatwall, or simply undertaking a major organization project, integrating French cleats from the start is the most efficient approach. This allows you to plan the layout and ensure the cleats are securely fastened to wall studs, which is paramount for supporting heavier items. However, you can also retrofit them onto existing walls. Simply locate the studs and screw the cleat strips directly into them. For instance, if you’ve just finished a large woodworking project and your workshop is a disaster zone, that’s the perfect moment to clear everything out, assess your needs, and build a French cleat system tailored to your tools and workflow. I’ve personally found that tackling this project after completing a particularly messy build is incredibly satisfying, as it immediately brings order to the preceding chaos. Don’t wait for the perfect moment; if your current storage is hindering your progress, now is the time to consider this upgrade. Even a small section of wall dedicated to cleats can make a significant difference in daily workflow.
Creative French Cleat Applications Beyond Basic Tool Holders
While hanging individual tools is the most common application, the versatility of the French cleat system extends far beyond simple tool racks. Consider creating custom shelves that can be moved or reconfigured as needed. Need a temporary shelf for a large project? Slot it in. Done with it? Remove it and store it flat. You can also build specialized holders for items that are awkward to store traditionally. For example, a long, narrow holder with small dividers is perfect for drill bits, screwdrivers, or even knitting needles. A deeper bin can hold bulkier items like spray cans or cleaning supplies. What many overlook is the potential for integrating charging stations. You can build a simple box with holes for drill chargers and mount it via a cleat, keeping your batteries organized and ready to go. I once built a custom holder for a router lift attachment that was quite unwieldy; mounting it on a cleat meant I could easily take it down for use and hang it back up without it cluttering my workbench. Another clever use is creating mobile tool carts. Build a cart and attach a French cleat to its side; now you can hang specialized tool holders from the cart, which can then be docked to your wall cleat system when not in use. This creates a truly integrated system where tools move with you.
Maintenance and Safety Considerations
Maintaining your French cleat system is generally minimal, but a few points are worth keeping in mind. Periodically check the screws holding the wall cleats to ensure they remain tight and secure, especially if you’re storing heavy items. Over time, wood can shift or screws can loosen slightly. A quick visual inspection every six months can prevent potential accidents. For safety, always ensure that the cleats you attach to your tools or shelves are well-made and securely fastened to the object itself. A weak attachment to the object, even with a strong wall cleat, can lead to the item falling. When cutting your cleats, always use appropriate safety gear, including eye protection and hearing protection, and ensure your saw blade is sharp for clean, safe cuts. A common error is using particle board for cleats; this material tends to crumble and doesn’t hold screws well, making it unsuitable for anything beyond very light-duty items. Stick to plywood or solid wood for reliability. I learned this the hard way when a shelf made from cheap particle board cleat decided to give way under the weight of a few paint cans. It was a mess, and a stark reminder to always use appropriate materials. Ensure the interlocking angle is consistent across all your cleats; even a slight variation can make connections feel sloppy or, worse, insecure.
The journey to a perfectly organized workshop doesn’t have to be a constant battle against clutter. French cleats offer a robust, adaptable, and cost-effective solution that transforms chaotic spaces into highly functional environments. By understanding how they work, how to build them, and how to creatively apply them, you can significantly boost your productivity and reduce the frustration of searching for misplaced tools. Isn’t it time you stopped wasting time searching and started spending more time creating?